Special Message


Showing posts with label vegetarian. Show all posts

Sunday, May 26, 2013

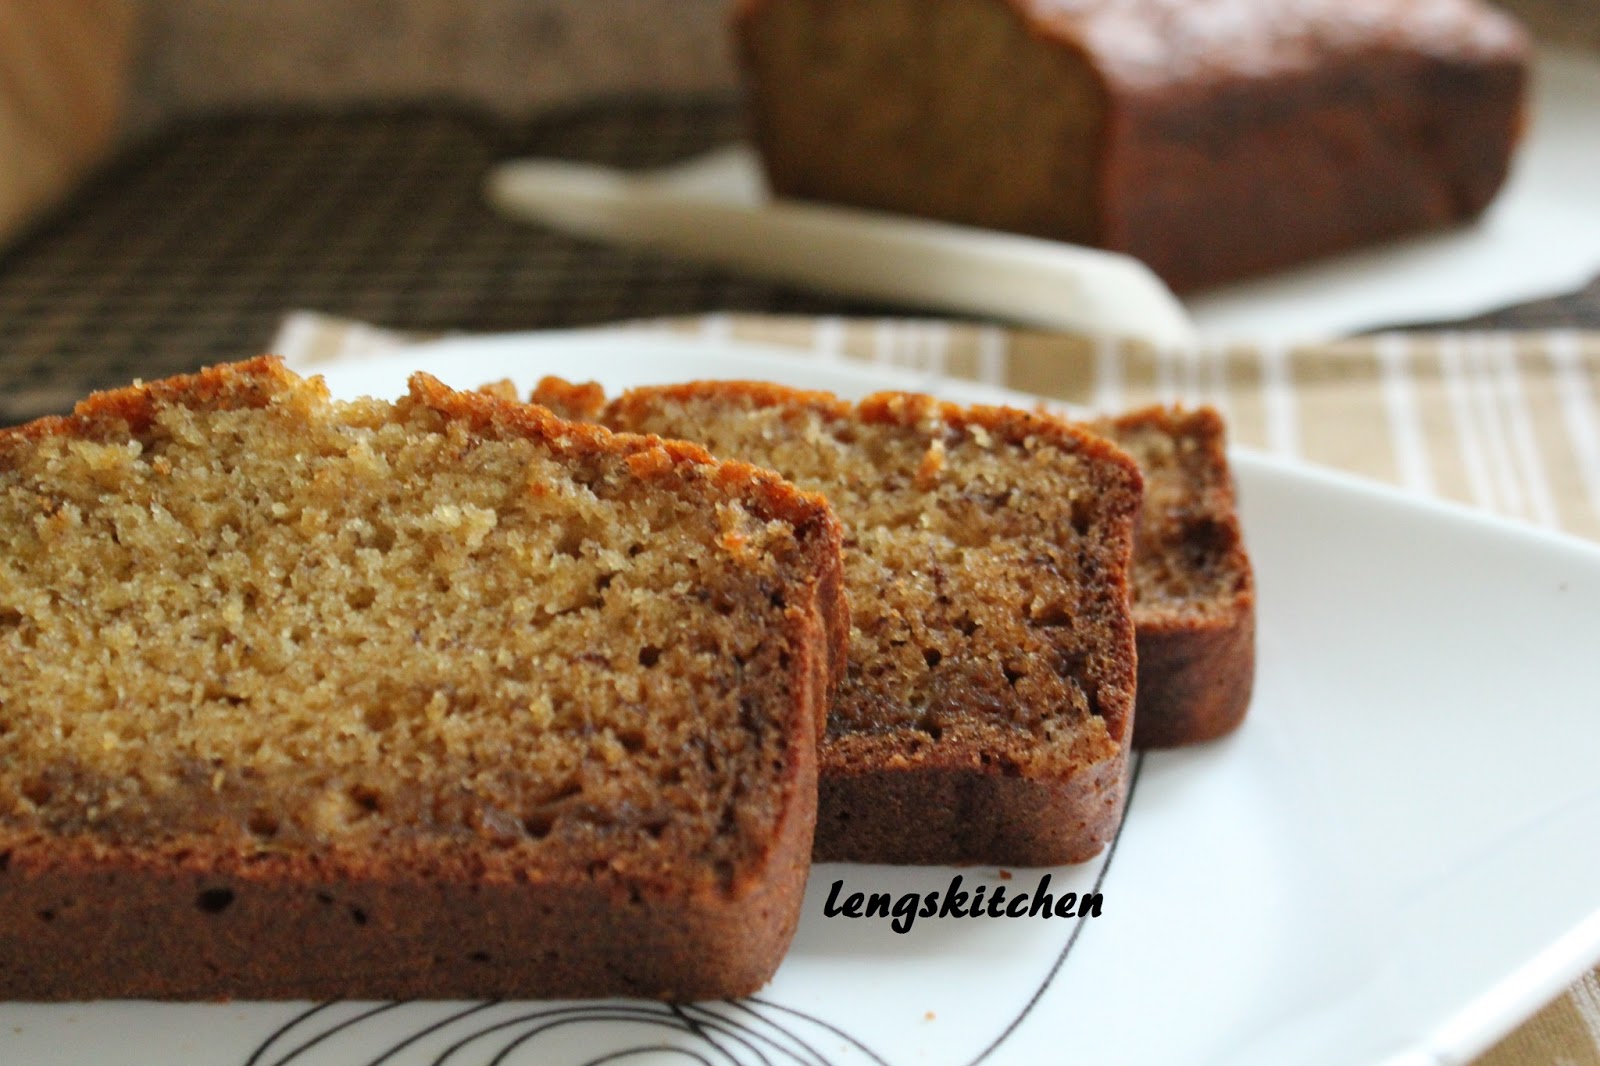
Banana Cake


It's baking time!

Well actually, this banana cake featured here was done quite a while ago. And the photos have sat in my to-blog folder forever! So long it probably is about time to be baking this again, soon...

This, is a favorite of mine (oh and I have got so many other favorites! lol). My history with the banana cake started even before I actually started schooling really. An uncle of mine used to man and run a concession stand right in the middle of a huge golf course back in my hometown. That's where the golfers stopped to take a break from the game, stay off the sun (and sometimes rain) for a brief moment and have a drink and something light to munch on before moving on.


And kids being kids - with nothing more practical and productive to do most of the days - weekends especially, this golf course was where I used to spend a whole lot of my free time back then. My job description included helping around whenever and wherever help was needed (even that came optional) and being the boss during the brief minutes of my uncle/aunt/or cousin sisters' absence. But really, a bigger part - no, in fact most of the time spent was just me (sometimes with my brother) and my cousin sisters playing around in the nature - feeding the fish and turtles in the surrounding ponds and chasing the monitor lizards (yup, not even kidding here lol!).

All these came with this - which was the best part of all - that I could help myself to the endless food and beverages at the concession stand all day long! The banana cake was my big time top favorite! Bought freshly baked daily from a bakery shop in town, I would always remember the aroma of the bananas lingering around, noticeable even before you actually make an entry into the shop. And as of the last time I checked with my mom-in-law, the shop's standing strong to-date still. Which, just reminded me - I probably should make a stop for a slice of the banana cake there during my next trip back!


That marked the official start between me and the banana cake story. Over the years, I have had plenty other banana cakes everywhere. You get them everywhere in Malaysia, thanks to the great abundance of the bananas grown locally. Bakeries aside, they have been greatly manufactured and are actually sold in pre-packaged loaves (with long expiry), just like how the everyday breads are sold. In fact, that's where you can find the banana cakes - on the bread shelves! With such a vast selection in the market, there are easily the really not-so-good ones - essentially baked with a bunch of flour making up the volume and artificially flavored with some banana essence giving the taste, probably with a tinge of coloring to make it look all the more appealing too. And of course there are the real good ones - nothing artificial in their making - just like the one that made me fall in love with the banana cake at my very first try decades ago.


The sweet Pisang Mas (or the mini bananas) makes the best banana cakes - a fact made known to me by my mom. But the baby bananas are not something that we see much around in the market here. So I resorted to using the main and the most popular commercial variety sold here - the Cavendish (or better known as the Montel bananas in Malaysia). Left to ripen fully when it will have more brown spots than yellow, the banana is said to be at their height of sweetness bearing the strongest banana flavour, which then makes it all perfect for baking...

This recipe is one I adapted from Christine from Christine's Recipes in her post on the Banana Cake Recipe. And this marked my second attempt at this using the same recipe. This second time, I have made an adjustment calling for a slight reduction in the amount of sugar used and a reduction in the baking time as well. Those two, are of course subjected to personal preference and the performance level of different ovens. But this is one that I have got really happy with for now, so here's me penning this down as a reference to myself hereon, and to everyone else who may share the same interest in baking a homemade loaf of banana cake...


Just a final note here - if you noticed the darker layer at the bottom of the loaf of banana cake, to be honest I was a little concerned with that bit when I first sliced through the cake, thinking that I might have underbaked it. But nope, that part wasn't sticky, nor was it hard or having a texture any different from the rest. It tasted perfectly fine! So really, why a different tone? I honestly have not an idea. Anyone with any idea?

Anyhow, you should really try this for yourself - the cake's moist, so fragrant and soft it makes my man at home who is just an ok ok person with the banana cake fall for it even!


Tuesday, April 16, 2013

Green Beans Omelet 四季豆炒蛋


This is your quick and easy 15-minute recipe (and my short and simple 1-hr-at-most post lol). Eggs have always been my best friend; their versatility has never failed to impress me. Easily paired, mixed and matched, you can have them the simple way (fried, boiled or poached simply), made just slightly complicated with them used in all the many kinds of omelets and simple stir-fry dishes like...

Or they can be incorporated into a little more complicated ones. Say...

That's quite a list of all the everything egg-related dishes I have posted thus far! But truth be told, the eggs have always been the really reliable one single ingredient that somewhat makes my life easy at times. They have come to my rescue time and again - when time is a limiting factor and you need to whip up a meal in no time; or you simply just run out of ideas as to what to put onto the dining table any nights; or you have an extra guest or two that you need a little something more to be served all too soon.

This omelet with green beans generously scattered all over - it's simple and totally inexpensive, tasty and nutritious - pretty much all the essentials in a single serving.


Friday, April 12, 2013

Durian Freeze 榴莲冰


A post in continuation to the previous three consecutive others all within one same chapter - this is one ending the episode on hubby's birthday celebration this year with a sweet note. A dessert and a drink long loved, a promise to try recreating it at home long made. Presenting... the "king of fruits" freeze!

Another big time favorite of his, I have not an exact idea as to when and how he started falling in love with this durian freeze. I have never known the durian freeze myself until we made a trip to Chicago a couple of years back, my first ever trip there. It was then when I was introduced to this restaurant chain by the name of Joy Yee's Noodles in the Chinatown-Downtown. It may be well known for its extensive menu with a range of real attractive food replicas displayed behind all those huge glass panels as you walk pass, but I have always loved it better for its drinks - specifically, the bubble tea drinks. My personal all-time favorite - the papaya milk tea with tapioca!


The durian freeze - it took me a while to accept the fact that such a drink actually exists. I mean, it's DURIANS made into an ice blended drink! lol. But taking a sip, it really isn't bad at all. In fact, it makes pretty good a drink! It is rich and creamy, sweet and tasty, not forgetting the fact that it comes packed naturally with the durian's unique flavor and fragrance. Seriously, whoever so creative that first came out with the idea must have quite a great sense of taste adventure in life!

A fruit with conflicting opinions like none others, the durian is indeed one that you either love or simply dislike. And this durian freeze, it is all the more so. Hubby's #1 choice for a while now, the durian freeze has always been a not-to-be-missed these days whenever we make a trip there to Chicago.

And he's certainly not the only person that I know who really does love this durian freeze. We have another friend who loves this just as much, if not more. Traveling together at times, it has almost been an unspeakable practice that we would usually end our trip there in Chicago with a stop to this place, starting our journey back after with a cup of drink of our choice in hand.


And have you ever been warned of the durian burps? lol. When you have two big fans of durian freeze, each with their cup of favorite drink traveling within the same car, the moment they take their last sips will be the moment when your nightmare is just about to begin! lol. Even with a world-class level of courtesy practiced to shield and protect the innocents, an experience of the aftermath is almost always guaranteed - it's inevitable!

Well... good for them - I will never despise them for just that few belches (although they may at times last the whole journey home) lol.


Back to this homemade version - having very little idea as to what really are the different ingredients to a cup of durian freeze, this set out to be an experiment, done with a little imagination (and my fingers crossed). Well good for me (and the birthday boy too, of course) - it turned out awesome! Naturally flavored with the durian itself, it is sweetened a little further with the use of just the pure coconut water and nothing more. The cooling coconut water balances the rich durian; and of utmost importance - its presence does nothing in altering the unique taste of the KING OF FRUITS.

durian, coconut water and ice cubes made of coconut water

And a real huge plus - this homemade version of durian freeze is real simple and all-natural!

Saturday, April 6, 2013

Matcha Kasutera (Green Tea Castella)


Green tea castella - this is totally a love at first sight story! The first time I saw Eugenie's post Green Tea Castella (Kasutera) Marble or Zebra Japanese Sponge Cake on her blog, it literally took me no time to decide that this is it - hubby's birthday cake this year!

Eugenie's page comes complete with a video on its making - short and concise, fresh and charming. Which really is a plus! Especially considering the fact that I have never dreamed of making or baking anything this fancy but now finding myself in the kitchen with my very first attempt at making this. I have a very limited history with castella. Apart from it being my all three sisters-in-law's favorite cake, I know not much about this popular Japanese sponge cake. And other than those times that we would make sure that we got a couple loaves of these cakes in the Japan Narita airport when we had a layover there on our way back to Malaysia, I have only had a couple other really countable times that I had had this elsewhere.


So making this was something totally new to me. And when you are making it for someone special and for some momentous occasions, there goes the stress building up, naturally. But it rounded up with a pleasant surprise - with all the hassle over and the cake done at the end of the day, it has then officially made me a fan of castella lol.

Light and delicate, moist and fluffy - it makes such a pleasant dessert that goes perfectly with a cup of hot Japanese green tea. And for a change (and a break from the super buttery Butter Cake that we last had not too long ago), it's rich without having the need to have butter, margarine or oil; and it's soft (and a little crumbly) without having to call for any leavening agents in it. Sweet but not overly so, I believe that this will now be a regular for us at home...


With no intention to make any changes to Eugenie's recipe, I set out trying to get everything that was needed for the making but still found myself short of two - the acacia honey and the cake pan with the specified measurement. Instead of the recommended acacia honey (one with a mild and delicate floral taste best suit the castella), I settled for the most widely available honey in the market - clover. I wouldn't be able to tell how one is better than the other (yet!) but I have got to say that I'm more than happy with this clover-version of castella. But the hunt will continue! And someday I'll be back with some extra notes when I have finally secured some acacia honey in hand.

Not having the right pan (one of a real adorable size 6.3"x2.4"x3.1"), I resorted to making some castella mini cakes using the muffin pan instead, the alternative as suggested by Eugenie in her post. 9 green tea castella mini cakes (only 8 shown, the lucky #9 went down my tummy as soon as it was ready lol) and a little decoration and there it goes - all ready for the mini celebration!


And that started the love story - one with me and the castella...

Having done and tried that first batch of the castella mini cakes, I had since really looked forward to making another - I assumed as soon as the mini cakes get polished off. And the time is here! I haven't got the right size of pan still; this is done using what I have in hand - the 9.25"x5.25"x2.75" loaf pan. With that, I tripled the amount to each ingredients - more than enough for just a loaf of castella but waste them not! The rest can be made into more of those mini cupcakes... a bonus!

Spreading the layers nice and neat takes a little patience (and practice too), pretty much like an art itself. In fact, I think the same elements apply well to the whole making in general. Sadly, my block of castella didn't turn out to be perfect. It browned pretty well on the top, but it wasn't exactly a smooth one - not even close to perfection. So pardon me with this not-so-perfect castella of mine this time around. "It adds a little human touch to the blog", says hubby... lol.


Doing a little more reading post baking, I probably know (I think!) what and how I should have done differently back then. Instead of letting it rest upright coming out of the oven, turning it upside down would probably be wiser a move to make. I guess it's pretty much the same with how a chiffon cake should be handled once it's removed from the oven. I'll be glad to have someone to enlighten me on this! That said, there will definitely be a next time for me with this part done right (and hopefully it IS the right thing to do lol). And when that happens, I'll be sure to be back with more updates!


As for now... I shall just sit back and enjoy this heavenly dessert while they last.

Sunday, March 31, 2013

Satay Peanut Dipping Sauce


Phew... it has been a while! The week started real fast and the first few days of the week went by in a swoosh! Hubby celebrated his birthday earlier this week. So really, the chaos was all about me trying to have a plan laid out for the mini celebration that we had over his birthday lol. A plan - one with a cake as the clock struck 12 in the midnight, a hearty breakfast to start off his day and a dinner plan on the big day itself.

Well I guess I must have planned too big a plan for me to handle comfortably. That few days prior, during and a day after pretty much witnessed myself working non-stop around the clock. It wasn't like I was preparing a party for tens or hundreds. In fact, apart from a dine-out dinner with a couple of close friends of ours, the rest was basically a mini celebration with just the two of us in the picture.


So then what was the chaos all about really?

Well, that was me dealing with plenty of my FIRSTs in preparing all his favorite dishes. You know, that pressure that builds up when you have zero experience in hand, and you have a plan that you so wished that it would not go wrong in any ways, all within a specific time frame. Stressed! I guess I'm never the right candidate who works particularly well under pressure lol. But but but... the plan went on well, and the birthday man had a good time (and a big feast, of course!). Phew phew...

the many different ingredients in the sauce making

The whole thing was... taxing. So taxing I slept so exceptionally well every single night! And then - I got unwell. Arghhh! What a week in life! And I slept even more. Right until today! I woke up feeling great, and I'm as fit as a fiddle now! So, I'm back!

Back to the birthday celebration. This satay peanut dipping sauce was really just a small part of it. It comes on the side alongside the main character that it always pairs best with - the chicken satay! Which was of course, hubby's all-time big favorite! And then there was the green tea castella mini cakes - not particularly anyone's favorite; the decision to make it just hit me - totally randomly. And then there's also a dessert to end it all - the durian freeze! Woohooo! lol.

the green tea castella mini cakes 

As small as the dipping sauce seems and sounds, I sweated over its making like none others. Another FIRST aside, my biggest issue was that I hadn't got a ready-for-use recipe in hand. Searching hi and lo over the websites and flipping through whatever cookbooks that I had with me, deciding and securing a recipe was proven to be even harder a task. Each looks awesome judging from just how they are presented, but then again no two recipes were close enough for me to securely feel safe with settling on either one.

Eventually I did. This is a recipe developed from the one featured by Kitchen Tigress in her post on How to Make Chicken Satay & Peanut Sauce. A recipe originated from The Best of Singapore Cooking  cookbook by Leong Yee Soo, it adapted a method somewhat unique and different from plenty others (in which it involves parboiling the peanuts). This sauce turned out really great! Fragrant and packed with a good crunch in every spoonful, it came with the right reddish hue so attractive it's such a delight to even just have it on its own. With a little tweak to make it slightly spicier (all a personal preference yes), I reckoned that this is definitely a recipe worth noting down (and a feature) and keeping!


And a final note - I made it a point to make a lot more than what I actually needed for those chicken satay that we had over a few days (probably about 30 skewers in total? Oh, and they were jumbo skewers btw lol). That allows for a really generous dipping with each skewer, not forgetting the cucumber/onion sides that came accompanying them.

So please do adjust the amount according to what you essentially need... and you're pretty much set to go!


Next up: The chicken satay!

Thursday, March 21, 2013

Economy Fried Vermicelli 经济炒米粉 (Updated)

Economy Fried Vermicelli 经济炒米粉 updated! With a couple more photos on the serving suggestions...

with the classic fried chicken

or sambal eggs!

Check out the Economy Fried Vermicelli 经济炒米粉 post for the recipe!

Saturday, March 16, 2013

Butter Cake


It feels as if the basic to cake baking always starts with making the butter cake. I know it was the case for my mom, and it certainly was for me. I started as an assistant to my mom even when I was a kid still. And I think I actually took commands from my mom pretty well back then lol. That was where I got my very first exposure to cake baking - with weighing, sieving, beating and mixing. And those pretty much summarized my experience in cake baking prior to my very first attempt in baking a cake, all on my own ever.

That, started pretty soon after I moved here, motivated by none other than the endless cravings that tagged along with me as I made the choice moving abroad lol. Mom has an exclusive butter cake recipe that she has been using probably for decades now. No, not this one featured here, but someday, someday I'll make sure that that specialty of hers gets featured here.


This recipe is one I adapted from Amy Beh at Kuali. It marked the first ever baking recipe that I have actually noted down in my personal recipe notebook, tried and tested a couple of times along the journey of my cake baking here.

Minor modifications were made here and there as I baked it again and again from time to time. Some intentional, some not. Specifically, the amount of sugar used has been reduced intentionally since the very beginning and evaporated milk was used in replacement of the fresh UHT milk specified in the original recipe. Unintentionally (and as silly as it may sound), I omitted the salt, again for a silly reason - I ran out of unsalted butter and resorted to topping the rest with the salted butter and thus explained the absence of any additional salt. Well surprisingly, it turned out yummy!


So this final edited version to the original recipe (with all the changes in between - intentional and unintentional) has been one that I have been sticking to for probably a year plus now, now a favorite of ours at home and among some friends who have actually tasted it too.

Sunday, February 17, 2013

Ngaku (Arrowhead) Chips 炸芽菇饼 - Chinese New Year Series


Woohooo! Ngaku chips in d' house! lol. Finding the arrowhead here in the Chinese grocer would be the biggest discovery I have had so far in terms of my grocery shopping experience here where we live. Not exactly those large and pretty ones that often come sold in bulk with the stock replenished just so often back in Malaysia, those sold here came in a very limited quantity. So yea, they come and go in a snap! But hey, it's ngaku in Michigan! And that gets translated to some ngaku chips at home! Plus it's technically Chinese New Year still! They collectively make quite good a picture on the whole, do they not? lol. Contented with the only option I have got, I got myself about 2lbs of those. Happy happy me!

Ngaku 芽菇 or chiku 慈菇 in Chinese and arrowhead in English, these are seasonal starchy tubers with a natural hint of sweetness in them. With a texture very similar to potatoes, probably just a little grainier, they make a real good candidate for chips. Their existence in the market and especially during the Chinese New Year wasn't made known to me until I was in my teens when mom bought home a canister of the ngaku chips and got us all addicted to the chips lol. It was such an immediate hit! But they sure didn't come cheap. Soon mom started making her own having gotten plenty of tips from all the housewives and homemakers friends of hers in the wet market she frequents.


A real simple recipe with just the ngaku, some salt and enough cooking oil for deep frying, the challenging parts about making the ngaku chips lie in getting them evenly and thinly sliced and frying them to perfection with the right heat. Slicing has surely been made easy with the use of a good mandoline these days. But time consuming it still is nonetheless. As with the frying, patience will be all you need apart from getting just the right heat. Applying the same rules of thumb with all the deep frying delicacies, using too low a heat and you'll turn them into chips laden with oil; too high and you will get chips with burnt rims and the center of the chips mostly undone in the end. But once that gets under control, everything else should come easy.


Thursday, February 7, 2013

Almond Thins 杏仁片脆饼 - Chinese New Year Series


These almond things are so unbelievably addictive! I fought so hard to refrain myself from nibbling on them the moment they are out of the oven. I went all "Hmm, this looks a little too brown for the jar of cookies. Mine it is! And that too, I think... nom nom nom" lol. At the end of it, each hue of brown just seems like they fit my appetite much better than they fit the final jar. Seriously! It is that bad! Totally unusual! Other times of any usual day, I would have spent so much time working on it and seeing it I hardly would have any appetite left for those baking stuff, at least not until the next morning. This is such an exceptional case!

I have never been a real big fan of this. I like having them when I actually have them, not particularly missing them when they have gone missing lol. But this time around, I think I am pretty sure that I'll be adding this to my list of favorite cookies. And the fact that it's one totally doable at home - that is a huge plus! A little patience and a little time if all that you need to get these crisps done. The credit goes to Lee Ping from Stream in the Hip Desert 新荒漠甘泉. Simple ingredients with just the almond flakes, egg whites, oil, sugar and flour, you'll be amazed with how well they blend with one another to give you a batch of relatively healthy, crispy and totally addictive almond thins. A snack simply made perfect for the festive season!


My two cents' worth:
  • Fresh! Fresh! Fresh! Get real good quality of almond flakes with freshness at their best! That being the key ingredient to these almond thins, a good batch will have won you half the battle.
  • Get it buttery! If you wanted them a little buttery (ooooh butter is yummy lol), have the oil substituted with melted butter instead. I may just do this the next time I'm at this again.
  • Spread it thin! I had to make this twice before I managed to get hold of the flow in its making and got myself to the right thickness (or thinness lol). The first time I had the batter spread out on one single 10"x5" baking sheet. It seems to fit just so perfectly. But nope. As little as the batter seems, it needed a lot more space than that. This second time, I divided the batter into two batches. That gave me plenty of space to spread them really thin, paper-thin! Voila! Perfect almond thins, brittle, crispy, you name it! Double time needed yes, but the pleasure at the end of it had also more than doubled! lol.
  • Single layer of flakes. As much as a mouthful of almond flakes in each bites seems like a big WOW, limit the flakes. Almond flakes spread out evenly in a single layer gives you a real thin layer, a little more elegance in its final appearance and of utmost importance, a more even color and time needed to bake them in general.
  • Protect the sides! The sides and corners of the batter will be first few areas to turn brown. Don't let them go to waste (they are so precious! lol). Cover it up loosely with strips of aluminium foil before you put them into the oven.


Let's yummmmmm away....

Tuesday, February 5, 2013

Beehive Cookies (Kuih Rose) 蜂窝饼 - Chinese New Year Series


More Chinese New Year cookies!!! Beehive cookies, honeycomb cookies, kuih loyang, kuih rose or we call it "kueh lobang" (in Hokkien) even, seeing these cookies makes the perfect indication that that the big festive season is just around the corner. My maternal grandma loved this, mom and all her sisters loves this and I loooove this. Sounds like something to do with the XX chromosomes eh? lol. Mom is not one that particularly likes baking. She easily gets impatient when it comes to baking. These beehive cookies are probably the only type of cookies that I have seen her making in our kitchen, apart from a couple of other cakes all of which are specialties of hers. So some years when mom's into the cookie-making mood, we'll be having this readily in the kitchen. Other years, we would just buy them!


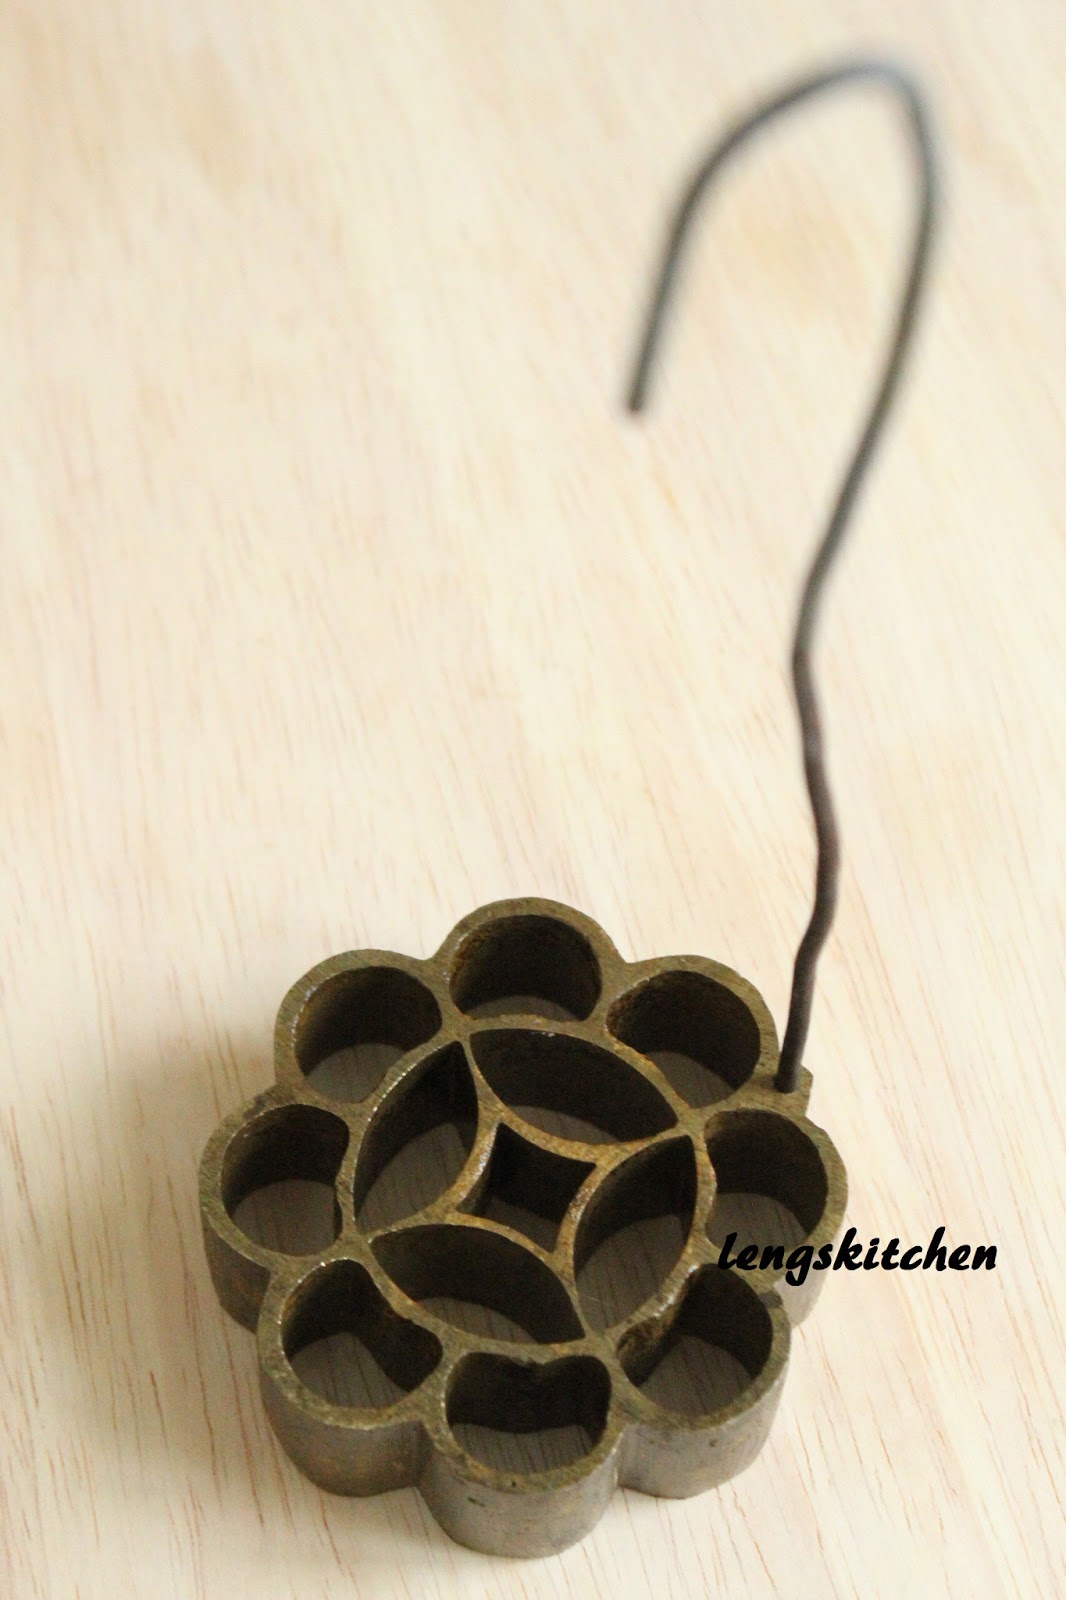
This brass mould was a real treasure of  my maternal grandma. It was passed down to mom for a good decade or two and when I moved here, mom made sure I brought it along with me. So old it sure is. But with it you can see how sturdy, strongly built, precious and especially meaningful it is to me. And of utmost importance, it never disappoints! So good I have never really considered looking for a brand new, shiny, perfectly polished moulds in the market even if that means that I can expect to spend a lot of time working with just one mould in hand.


As much as we both love this, we couldn't help rambling and grumbling each time we had to buy these cookies. Well yet we did it time after time, again and again lol. For some really basic and simple ingredients used in its making, the hefty price printed on the price tags do make it a little hard a fact to accept. But then again I have to agree; they do have good reasons to be so well priced after all.

Making this is like a battle against the heat. Physically you will have to endure the heat as you stand in front of the wok patiently frying them away - another reason it always drives mom away from the idea of making this back at home. I was spared the agony here; the freezing cold weather outside made it all so nice for me to be working with some heat indoor. And then comes the battle of heat between the batter and the oil. You will have to spend a moment experimenting in the beginning and adjusting thereon. I made 44 pieces in total in this batch; 3 got beyond recognition (way too browned - the hot oil won hands down intimidating the batter lol); another 2 was kind of lacking in presentation and appearance (the batter and oil started getting used to one another nevertheless lol). But once you have managed to reach that equilibrium between them, the rest of the story is about maintaining the flow and keep the connection steady in between the two.


This is my fourth time making these beehive cookies and it comes with plenty of trials and errors going on still. Using a recipe I adapted from My Kitchen Snippets on her post on Kueh Rose/Kueh Goyang this time around with just some minor adjustments, this recipe is by far the best recipe that has given me a batch of beehive cookies that really look like what their name suggests lol, not forgetting the promised crunch and mouthfeel that come in a package. Look out for the few extra notes that I penned down alongside the methods as they get laid out. Some simple points, but they are exactly the little details I will usually pay attention to for a batch of nicely shaped beehive cookies (although I do tend to forget them myself and thus a need for some self-reminder here).


Friday, February 1, 2013

Melt-in-Your-Mouth Pineapple Tarts 黄梨酥 - Chinese New Year Series


Woohoo, let the baking fun continue! Homemade Pineapple Jam - checked! Patience recharged overnight - checked! Baking motivation still intact - checked! Checked! lol. And now it's time to get the tarts rolled up! Another recipe from Wendy at Table for 2.....or More which she in turn had adapted from this recipe, you get just what the name promised - pineapple tarts that simply melt in your mouth!

To deal with a dough that has got the cream cheese and the whipping cream in it is not one that I'm familiar with. But I guess they are there to serve their ultimate purpose. The tarts are soft, fluffy, creamy and rich but not overly so, flaky and simply pretty and elegant to look at! Heavy on the diet yes, but hey, it's Chinese New Year! What can be a better time to let your guard down temporarily and indulge away? Lets just deal with that diet issue a bit later. Sign up for some runs! I had! So by hook or by crook, these extra calories will have to go sometime after the New Year! *evil laugh* lol.


Let's get the baking started!

Thursday, January 31, 2013

Homemade Pineapple Jam - Chinese New Year Series

A short break from mom's recipe lol. I officially started my Chinese New Year baking just few days back. Our first year of celebrating it together here in the State, it's a a huge break from the usual family tradition of ours growing up. But that also marks the start to our very own family tradition here. No special plan, just a simple reunion dinner perhaps, and a relaxing weekend lazying away lol. We may have some friends over to make it a little merrier, but that's about it. So apart from the small family reunion dinner to think of (or a medium one with friends), I have another 10 days to go, free and easy!

Not going back has come with a price to pay too. That means a no to all the non-stop feasting back in our hometown, a no to a good chance for family and friends to get together and do crazy stuff together, and a no to all the special delicacies that you will only get to see and taste especially on a big festive season like this. The Chinese New Year cookies easily top the "Food that I shall Miss the Most" list of mine lol. To make things worse, I have never actually seen them sold anywhere around where we live here. So sad... So if you want it, then make it yourself! To make up for the rather low-key, unusual, fresh and out-of-the-norm idea of celebration that we will be having this year, I made a vow to make us feel good and at least contented with the decision of us to stay put this year. And I SHALL bake my own batches of cookies! Well lets just hope that the motivation won't dim off any moment soon lol.


I don't remember ever taking baking this seriously in the past. I'm not one who's so into festive baking. But I do bake for fun especially at times when it's least expected of me. This, however, is a whole different scenario. At least I myself am expecting something out of it as the New Year approaches lol. My very first attempt this year - the pineapple tarts! Whoa! Sounds like a big project! And it is! But honestly if I should just make do with one single type of cookies this year, it will have to be these tarts! I'm such a big fan that thinking about not having it for another year has sufficed in getting me started. Seriously! lol. And now I regret not learning it from Jin, a housemate of mine, when she made us all a batch when we celebrated that year's Chinese New Year back in Glasgow. And I regret not paying my full attention and helping my mom-in-law when she made that just a year ago when we were back in Malaysia.

Well then the Internet it is! This is a recipe I got from Wendy at Table For 2.....or More - the ever reliable source for cooking ideas and recipes! And sure enough, despite the hectic process with plenty of time invested and some hiccups in between, the pineapple jam turned out perfect! So good I could already picture how gooey and nice they will be when wrapped in the dough for the tarts soon, real soon! Now fingers crossed that the dough will turn out just as perfectly as this!

Related Posts Plugin for WordPress, Blogger...